Window >> Editor toolbar >> Classification settings (Automatic option) >> General settings (tab)
Classes to be extracted, the density of point clouds and the value of the H-index parameter are specified in the General Settings tab,

Density
Classification algorithm in almost every step of processing performs analysis of neighborhood. Based on points in the neighborhood, in particular stages of classification, specific characteristics are calculated for each point. Consequently, if characteristics satisfy certain criteria, points are assigned ground, building or vegetation class, depending which stage of classification is running. For example during the classification of ground, each point is assigned its normal vector*. Normal vectors can be recomputed few times, each time using different neighborhood radius. Processing clouds of low density requires applying larger neighborhood radius than processing points of high density. To obtain best classification results it is important to specify adequate density setting (low, medium, high). Of course, You can try running classification of the dense clouds (eg 20 pts/m2 ) using medium or low-density settings and still obtain fine results but You may expect longer processing times as more points will be involved in normal vector computation and other computational procedures. On the other hand, processing sparse clouds (eg 1-2 pts/m2) if the high-density option is selected may result in failure of the classification process as the algorithm wouldn't be able to find a sufficient number of points to estimate normal vectors.
*normal vector - vector perpendicular to the locally estimated surface
Output class selection
There is a number of reasons You may not want to conduct the complete classification procedure, involving assigning all types of classes to points. For example:
1.You are interested in searching only ground points.
2.You are interested in building modeling and You need only building class.
3.You are satisfied with Your ground points but You have problems finding optimal parameters for extracting buildings and vegetation.
etc..
In all of the cases mentioned above carrying out full classification would be a kind of time waste. For example, if You need only building points for Your building models check the ground and buildings boxes (remember: correct building extraction requires also ground classification: see Classification steps). In the third case, the proper choice would be checking "buildings" and "vegetation" boxes and re-classifying cloud using different settings.
The table below specifies which classes should already be extracted in the input data set for each combination of selections.
no. |
result class |
is allowed |
input data requirements |
1 |
none |
No |
- |
2 |
ground |
Yes |
- |
3 |
buildings |
Yes |
input dataset need to have ground points (layer 2) extracted |
4 |
vegetation |
Yes |
input dataset need to have ground points (layer 2) and buildings (layer 6) extracted |
5 |
ground, buildings |
Yes |
- |
6 |
ground, vegetation |
No |
- |
7 |
buildings, vegetation |
Yes |
input dataset need to have ground points (layer 2) extracted |
8 |
ground, buildings, vegetation |
Yes |
- |
H-index subdivision

H-idnex calculation is performed once before ground classification. Before calculating h-index point cloud is divided into blocks with certain x and y dimensions and infinite z dimension. Subsequently, each point in each block is assigned the h-index. H-index is calculated as follows: the highest point in each block is assigned the value of 1. The lowest point in each block is assigned the value of 0. All other points are assigned the proportional value in the 0...1 range. Points with H-index less than 0.01 are the ground seed points and are used as base points for the ground growth process.
The H-index Subdiv. setting specifies the x and y dimensions of each subdivision block and has a meaningful impact on the classification results.
If the H-index Subdiv. is too small, points representing roofs of large buildings will also be assigned h-index values less than 0.01 as the roof border can comprise the whole block footprint. In such a case some ground seed points will be located at roofs finally resulting in classifying building points as ground points. In the opposite case - H-index Subdiv. is too large - the total number of ground seed points will be too small and the distance between them too large to properly finish the ground classification within a certain number of iterations. As a result, You are supposed to observe some "point islands" not having the ground class assigned and having building class or unclassified class assigned instead. When specifying a high value of H-index subdivision it is likely to miss some ground points in courtyards as each courtyard needs to have at least one ground seed point to extract all ground points in the courtyard. Therefore it is best to specify H-index only slightly larger than the dimensions of the largest building in the area.
If You are classifying woodlands feel free to set low H-index Subdiv. value (eg. 10 m). In case of classifying suburban areas with houses and industrial buildings, especially if some hills and steep areas are also present in the data set, it may be hard to find optimal h-index subdivision value. In such cases, You may need to divide Your input data set into two or more sections and apply different H-index Subdiv. for classifying each of them.
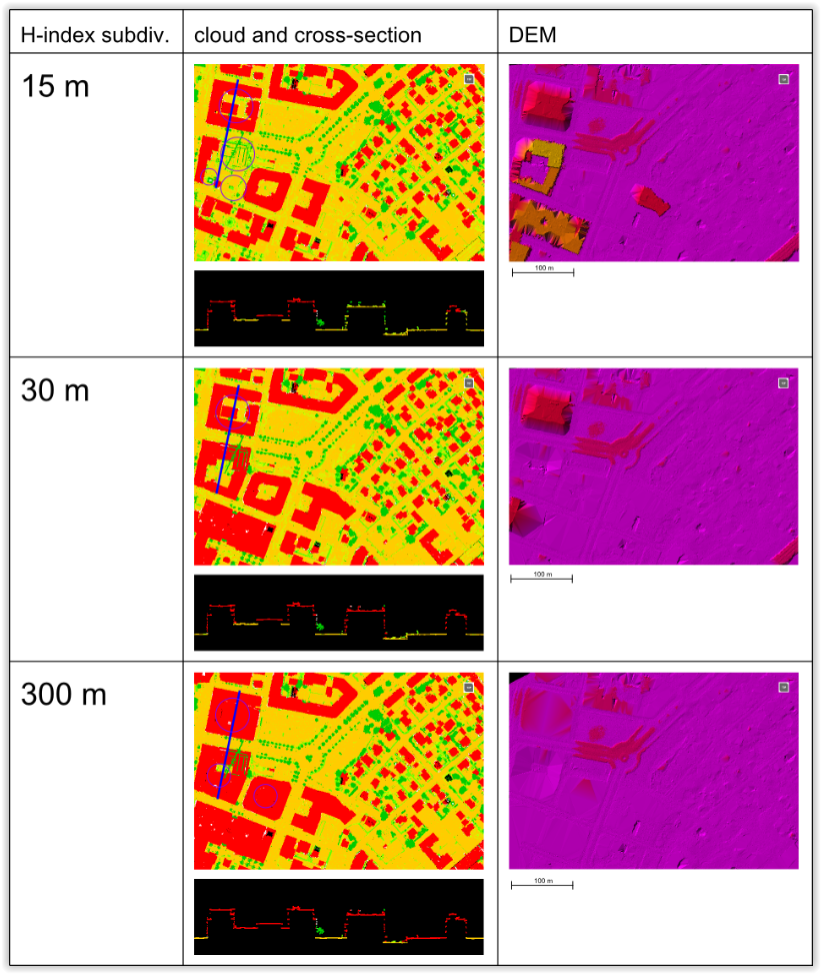
The table below illustrates the impact of applying different h-index subdivision settings on the classification results. Areas sensitive to H-index Subdiv. value are marked by the circle. The cross-section line is shown in blue. The 30 m H-index subdiv. value seems to be a good choice. However, the courtyard of the building in the upper-left corner was classified as ground what can be seen as an error.
Hotkey: Edit.SettingsDialog